
Sending Email
Email is a system user delivered via electronic medium through one or more recipients via one medium
Before starting email activity you must know the email functionality with intent, meaning the data is from one component to another, as well as taking data out of the application or application
To send an email from your application, you do not need to implement an email client from the beginning, but you can use an existing one like the default email app given from Android, Gmail, Outlook, K-9 Mail etc. Can. Objective, we must write an activity that launches an email client, using the correct action and data with an implicit intent. In this example, we will send an email from our app using the intent object that launches the existing app client.
In the following section we need to send an email to different parts of our intent.
Intent Object - Action to send Email
You will use ACTION_SEND action to launch an email client installed on your Android device. Following is simple syntax to create an intent with ACTION_SEND action
Intent emailIntent = new Intent(Intent.ACTION_SEND);Intent Object - Data/Type to send Email
To send an email you need to specify mailto: as URI using setData() method and data type will be to text/plain using setType() method as follows −
emailIntent.setData(Uri.parse("mailto:"));
emailIntent.setType("text/plain");
Intent Object - Extra to send Email
Android has built-in support to add TO, SUBJECT, CC, TEXT etc. fields which can be attached to the intent before sending the intent to a target email client. You can use following extra fields in your email −
| Sr.No. | Extra Data & Description |
|---|---|
| 1 | EXTRA_BCC
A String[] holding e-mail addresses that should be blind carbon copied. |
| 2 | EXTRA_CC
A String[] holding e-mail addresses that should be carbon copied. |
| 3 | EXTRA_EMAIL
A String[] holding e-mail addresses that should be delivered to. |
| 4 | EXTRA_HTML_TEXT
A constant String that is associated with the Intent, used with ACTION_SEND to supply an alternative to EXTRA_TEXT as HTML formatted text. |
| 5 | EXTRA_SUBJECT
A constant string holding the desired subject line of a message. |
| 6 | EXTRA_TEXT
A constant CharSequence that is associated with the Intent, used with ACTION_SEND to supply the literal data to be sent. |
| 7 | EXTRA_TITLE
A CharSequence dialog title to provide to the user when used with a ACTION_CHOOSER. |
Here is an example showing you how to assign extra data to your intent −
emailIntent.putExtra(Intent.EXTRA_EMAIL  , new String[]{"Recipient"});
emailIntent.putExtra(Intent.EXTRA_SUBJECT, "subject");
emailIntent.putExtra(Intent.EXTRA_TEXT   , "Message Body");
The out-put of above code is as below shown an image
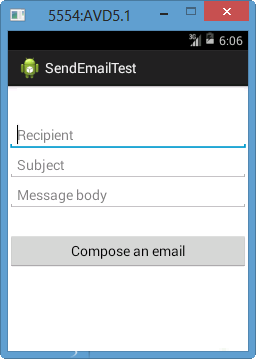
Email Example
Example
The following example shows you practically how to use the intent object to launch email clients to send email to given recipients.
To email experiment with this example, you will need the actual mobile device equipped with the latest Android OS (Android Lollipop), otherwise you may get conflicts with emulators that can not work properly. Second, you need to have an email client like Gmail (by default the Gmail client application in every Android version) or K9mail on your device.
| Step | Description |
|---|---|
| 1 | You will use Android studio to create an Android application and name it as Fastread under a package com.example.Fastread. While creating this project, make sure you Target SDK and Compile With at the latest version of Android SDK to use higher levels of APIs. |
| 2 | Modify src/MainActivity.java file and add required code to take care of sending email. |
| 3 | Modify layout XML file res/layout/activity_main.xml add any GUI component if required. I'm adding a simple button to launch Email Client. |
| 4 | Modify res/values/strings.xml to define required constant values |
| 5 | Modify AndroidManifest.xml as shown below |
| 6 | Run the application to launch Android emulator and verify the result of the changes done in the application. |
Following is the content of the modified main activity file src/com.example.Fastread/MainActivity.java.
package com.example.Fastread;

import android.net.Uri;
import android.os.Bundle;
import android.app.Activity;
import android.content.Intent;
import android.util.Log;
import android.view.Menu;
import android.view.View;
import android.widget.Button;
import android.widget.Toast;

public class MainActivity extends Activity {
   @Override
   protected void onCreate(Bundle savedInstanceState) {
      super.onCreate(savedInstanceState);
      setContentView(R.layout.activity_main);

      Button startBtn = (Button) findViewById(R.id.sendEmail);
      startBtn.setOnClickListener(new View.OnClickListener() {
         public void onClick(View view) {
            sendEmail();
         }
      });
   }
   protected void sendEmail() {
      Log.i("Send email", "");
      String[] TO = {""};
      String[] CC = {""};
      Intent emailIntent = new Intent(Intent.ACTION_SEND);

      emailIntent.setData(Uri.parse("mailto:"));
      emailIntent.setType("text/plain");
      emailIntent.putExtra(Intent.EXTRA_EMAIL, TO);
      emailIntent.putExtra(Intent.EXTRA_CC, CC);
      emailIntent.putExtra(Intent.EXTRA_SUBJECT, "Your subject");
      emailIntent.putExtra(Intent.EXTRA_TEXT, "Email message goes here");

      try {
         startActivity(Intent.createChooser(emailIntent, "Send mail..."));
         finish();
         Log.i("Finished sending email...", "");
      }
      catch (android.content.ActivityNotFoundException ex) {
         Toast.makeText(MainActivity.this, "There is no email client installed.", Toast.LENGTH_SHORT).show();
      }
   }

   @Override
   public boolean onCreateOptionsMenu(Menu menu) {
      // Inflate the menu; this adds items to the action bar if it is present.
      getMenuInflater().inflate(R.menu.main, menu);
      return true;
   }
}
Following will be the content of res/layout/activity_main.xml file −
 xmlns:android="http://schemas.android.com/apk/res/android"
   android:layout_width="fill_parent"
   android:layout_height="fill_parent"
   android:orientation="vertical" >


      android:id="@+id/textView1"
      android:layout_width="wrap_content"
      android:layout_height="wrap_content"
      android:text="Sending Mail Example"
      android:layout_alignParentTop="true"
      android:layout_centerHorizontal="true"
      android:textSize="30dp" />


      android:id="@+id/textView2"
      android:layout_width="wrap_content"
      android:layout_height="wrap_content"
      android:text="Tutorials point "
      android:textColor="#ff87ff09"
      android:textSize="30dp"
      android:layout_above="@+id/imageButton"
      android:layout_alignRight="@+id/imageButton"
      android:layout_alignEnd="@+id/imageButton" />


      android:layout_width="wrap_content"
      android:layout_height="wrap_content"
      android:id="@+id/imageButton"
      android:src="@drawable/abc"
      android:layout_centerVertical="true"
      android:layout_centerHorizontal="true" />


      android:id="@+id/sendEmail"
      android:layout_width="fill_parent"
      android:layout_height="wrap_content"
      android:text="@string/compose_email"/>
Following will be the content of res/values/strings.xml to define two new constants −
xml version="1.0" encoding="utf-8"?>

    name="app_name">Fastread
    name="hello_world">Hello world!
    name="action_settings">Settings
    name="compose_email">Compose Email
Following is the default content of AndroidManifest.xml:
xml version="1.0" encoding="utf-8"?>
 xmlns:android="http://schemas.android.com/apk/res/android"
   package="com.example.Fastread"
   android:versionCode="1"
   android:versionName="1.0" >


      android:allowBackup="true"
      android:icon="@drawable/ic_launcher"
      android:label="@string/app_name"
      android:theme="@style/AppTheme" >


         android:name="com.example.Fastread.MainActivity"
         android:label="@string/app_name" >


             android:name="android.intent.action.MAIN" />
             android:name="android.intent.category.LAUNCHER" />
Try to run your fastread application. I think you are connected to your real Android mobile device with your computer. To run an app from Android Studio, open an activity file from your project and click the Run icon from the toolbar before launching your application, the Android Studio Installer will display the following window to select an option, where you Want to run your Android application Choose your mobile device as an option and then check your mobile device which is a display
Now use the Write Email button to list all the installed email clients From the list, you can choose an email client to send your email. I am going to use Gmail client to send my email which will be all the default fields provided as shown below. From here: The default email ID is that you have registered for your Android device.
You can modify either of the given default fields and finally use send email button to send your email to the mentioned recipients.